MONTHLY ACTIVITIES
Wild Activities: Adventures in Nature
Welcome to our activities page. Each month we will post a seasonal activity to hopefully inspire you to go outdoors and connect with nature. Some of these activities will be aimed at children and families while others will be more appropriate for adults, but we hope that whatever your age or stage you will find ideas here that take you on an adventure in nature.
WINTER
December
Christmas Swag
![]() December has arrived and Christmas preparations can begin in earnest. An important part of the preparations is decorating the house. There is a long tradition of collecting evergreens like holly and ivy. Back in the pagan times, evergreens symbolised the return of Spring, an important message of hope at the time of the winter solstice and long, dark winter evenings. This month’s activity uses evergreen materials to make a Christmas swag that was popular during the Middle Ages.
December has arrived and Christmas preparations can begin in earnest. An important part of the preparations is decorating the house. There is a long tradition of collecting evergreens like holly and ivy. Back in the pagan times, evergreens symbolised the return of Spring, an important message of hope at the time of the winter solstice and long, dark winter evenings. This month’s activity uses evergreen materials to make a Christmas swag that was popular during the Middle Ages.
You will need:
Short branches of pine, spruce or fir, a length of wide red ribbon, short branches of holly, lengths of ivy, pine cones, wire and wool.
Go for a walk in the forest. Take a basket and a pair of secateurs for snipping short branches of holly (preferably with red berries) and ivy. After windy weather it is usually easy to find branches of fallen Douglas Fir, or other firs, pines, and spruces. Keep a sharp eye out for pine cones and other natural materials for decorating your swag.
At home, on a table, arrange the branches of Douglas Fir and holly in a fan shape. Add the ivy and tie everything together with wool. Tie a piece of wire around each pine cone and wire the cones onto the swag. Neaten the ends of the branches by snipping off any unneeded material. Finish by tying a red or tartan ribbon around the swag and hang it on your front door, gate or even a barn door as in the photo.
January
 Ice Pictures
Here in Wales, January often brings our first fall of winter snow and the temperatures dive overnight, barely rising above freezing level the following day. This creates the perfect environment for making ice pictures. For this project you will need to wrap up warmly and go for a walk in your local woods or park, taking a bag for storing and carrying the natural materials you collect. When out on your walk remember to look around you for signs of winter: birds gorging on the last of the berries; tracks and trails of mammals and birds in the snow and leafless trees silhouetted against the winter sunset, their branches black lace-like against the sky. If going on a walk as a family, remember to pack a flask of hot chocolate to encourage any young stragglers!
You will need:
A variety of natural materials collected from the woodland floor or along the hedgerow on your walk e.g. holly berries, alder cones, the last of the autumn leaves, fir or spruce needles etc.
Old, empty plastic containers (e.g. margarine or ice-cream tubs) or plastic/metal plates
String or wool
Water
What to do:
1. Arrange your natural materials on the plate or at the bottom of the recycled container.
2. Fill the plate or container with enough water to cover the natural materials.
3. Cut a length of string or wool and make a loop out of it, tying the ends together and laying it on the side of the plate or tub with the knotted ends in the water and the loop hanging out (this will be used to hang your ice picture).
4. Leave the plate or container outside overnight for the water to freeze.*
5. The following morning, release your frozen ‘picture’ from the container (you may need to use a little hot water around the edges to help with this process). Using the string loop, hang it outside on a branch or fence. If you make several, they look beautiful together hanging on a tree.
*If the temperature doesn’t drop below freezing point overnight, you can put your containers in the freezer overnight.

January
Bird Feeders
Winter is a difficult time for birds. The berries of autumn have long since been eaten, the insects are hibernating, and the weather can be very cold. But we can help the birds by feeding them in our gardens. There’s no need to spend lots of money on bird food to attract birds to your garden. Birds enjoy kitchen scraps like grated cheese, bread, cooked rice, cake and biscuit crumbs, apples and pears past their best, cooked potatoes (jacket, roast and mashed) and pastry.
This month’s activity is all about making bird food to hang in your garden.
You will need: 
250g lard
50g breadcrumbs
50g grated cheese
50g porridge oats
50g chopped unsalted bacon rind
50g sultanas.
Small, empty yoghurt pots
String
What to do:
1. Melt the lard in a saucepan.
2. Mix all the other ingredients in a bowl.
3. Pour the lard over the mixture in the bowl and stir well.
4. Make a small hole in the bottom of the yoghurt pot.
5. Cut a piece of string about 75 cm long.
6. Tie a knot in the string about 20cm from one end.
7. Taking the end of the string furthest from the knot, feed the string through the open end of the pot and through the hole in the bottom of the pot until the knot reaches the hole.
8. Fill the pot with the bird food mixture, ensuring the string is still hanging out from the top.
9. Once the mixture has cooled, hang the pots outside on branches using the longer end of the string.
10. The pot should be hanging upside down and the birds will land on the shorter length of string hanging below the food to reach up inside the pot and eat the food.
Enjoy watching the birds that visit your garden to feed! Remember to take part in the RSPB’s ‘Big Garden Birdwatch’ at the end of this month. For further details of this go to: https://www.rspb.org.uk/get-involved/activities/birdwatch/
February
Although the shortest month of the year, February can often feel never-ending as the long, dark days of winter take their toll. This month’s activity encourages us to use all of our senses outdoors, find beauty in nature and feel alive once more, ready for the spring.
This is an activity for both adults and children. Scroll to the bottom for a printable PDF version for children where they can tick the boxes as they go.
Winter Sensory Scavenger Hunt
Instead of the traditional scavenger hunt which encourages us to look for and collect natural objects, this scavenger hunt encourages us to capture experiences in nature through our senses. So, wrap up according to the weather and enjoy a mindful walk in nature, using your senses to collect the following experiences/sensations.
Smell:
a) Fresh air b) Gorse flowers
c) Wet leaves d) Pine needles crushed between your fingertips
Look for:
a) Catkins b) Animal/bird tracks in mud or snow
c) Pause for a few minutes to watch clouds moving across the sky
d) Trace with your eyes the silhouette of a bare tree against the sky
Listen to:
a) A robin singing b) Creaking trees/branches
c) Water flowing d) The wind
Touch:
a) A cold, smooth stone b) The bark of different trees
c) Soft moss d) Feel the wind in your hair or against your face
Taste:
Raindrops or snowflakes on your tongue.
February
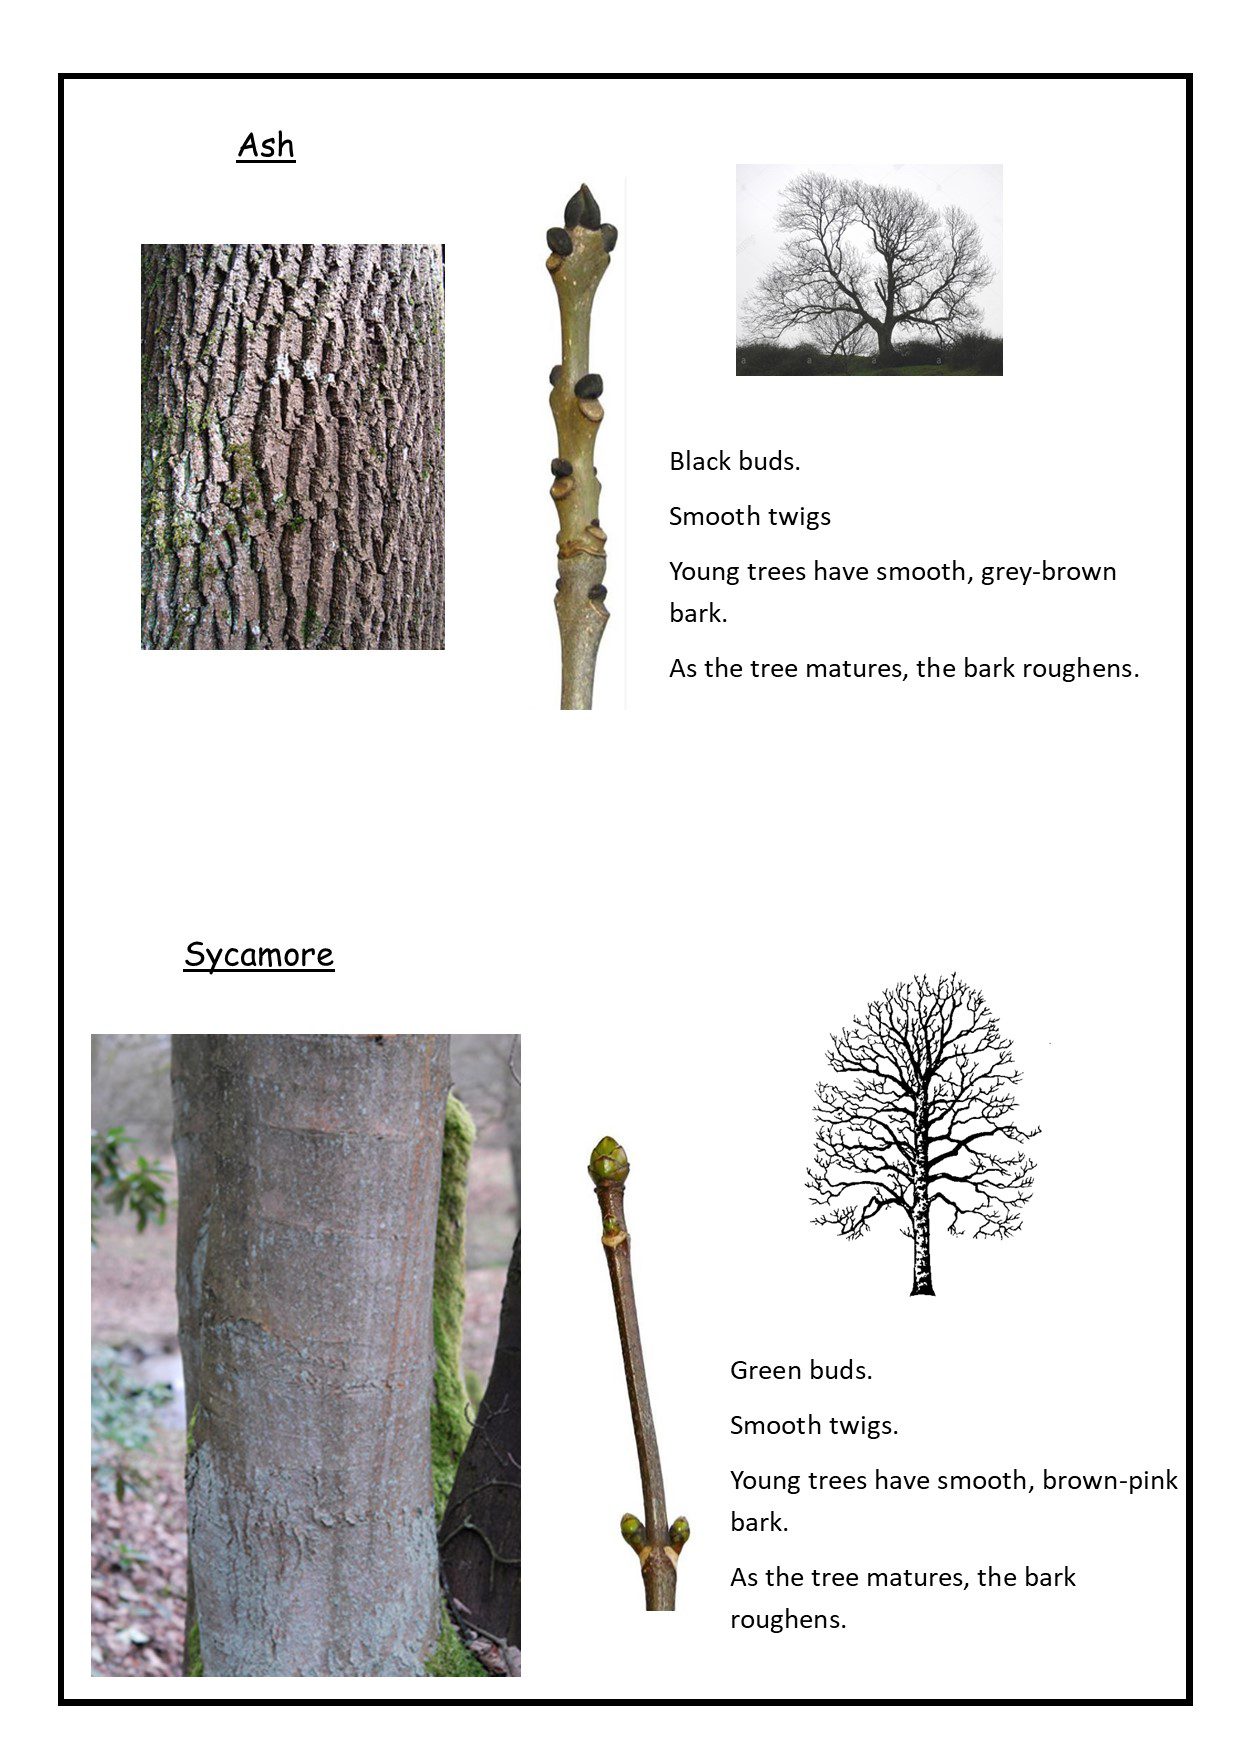
If you are unsure how to tell your ash from your oak in the winter, February is the perfect time to go out for a walk and get to know your trees by recognising their bark and buds. As spring draws closer, leaf buds swell – helping us to identify the tree. Every species of tree has its own individual buds. Use our sheets below to help you recognise trees of the wildwood in the wintertime.
Click on the image for a PDF version.


SPRING
March
Sit Spot
Birds are courting and busy building nests, buds are swelling and bursting into leaf, the fields are filling with new-born lambs and wildflowers are quietly appearing in hedgerows. Nature is beginning to awaken after its long winter sleep. This is the perfect time to start using a ‘sit spot.’
 A Sit Spot is a quiet place in nature that you visit regularly, using your senses to develop your awareness of and connection to nature. Time spent in nature helps lower blood pressure, improve concentration, and develop imagination and creative thinking. Sit Spots were used by our ancestors to gain knowledge of birds, plants and trees and develop their animal tracking and wilderness survival skills. Sit Spots have also been used by naturalists to learn about patterns in nature and animal and bird behaviour. Adults and children can all use Sit Spots today to help us relax, improve our wellbeing, and get closer to nature.
Choose a quiet place in nature, which could include your garden or local park. Sit Spots are more effective if used regularly, so ease of access is important. Find a spot where you can sit comfortably and safely. Try not to take your mobile phone, or if you must, put it on silent.
Next, use your senses to help you become more aware of your surroundings.
• Touch – notice the ground supporting you, touch the bark of the tree you may be leaning against, feel the sun on your face.
• Smell – damp earth after a shower, flowers, the air around you.
• Sight – observe the many shades of colour, the way a bird moves, the veins in a leaf. Become aware of and use your peripheral vision.
• Listen – become aware of the nearest/furthest sound, can you hear birds or the wind?
• Taste – this is more difficult, but raindrops and snowflakes offer possibilities!
The secret to improving our wellbeing in a Sit Spot is to ‘tune in’ rather than ‘zone out.’ If you find distracting thoughts creeping in, use your senses to bring you back to the present once more.
Try to make Sit Spots a part of your daily or weekly life. Ten minutes sitting quietly outdoors on a regular basis can make a huge difference to your wellbeing. You might be able to sit for longer at weekends or in the evening. Sunrise and sunset can be magical times for a Sit Spot. Notice the changes around you as the seasons progress. Some people like to take a journal with them, to record through words and drawings what they observe and feel. Find out more about sit spots here.
Enjoy!
March
Frogspawn Hunting
 March is the first month of spring and frogspawn is one of the first signs of spring. This month’s activity is a walk to visit local ponds or the edges of slow flowing streams to look for frogspawn. Frogs lay their eggs in clumps, each small black egg coated in a protective bubble of jelly. One clump of frogspawn can contain up to 2,000 eggs, but the life of a frog is fraught with many dangers and only one in fifty eggs will make it to adulthood. Frost can kill frogspawn, and herons, newts and dragonfly larva are very partial to tadpoles.
Once you have found some frogspawn, visit it regularly to watch how the egg gradually develops into a small frog. It takes 3 weeks for the tadpoles to hatch, and then another 14 to develop into small frogs. How long before the legs start growing, and is it the legs or arms which appear first? You will be able to answer these questions through observing your local pond! When visiting your local pond or stream, keep a look out for other pondlife such as dragonflies and pond skaters, birds that visit to drink water and animal tracks in muddy areas at the edge of the pond or stream.
April
Make a Bird’s Nest
The birds are very busy at the moment building nests and laying eggs. Keep an eye out for birds carrying twigs, dried grass and moss in their beaks. This month’s activity is one for the kids – build a bird’s nest using natural materials.
Go out to the garden to collect thin twigs, moss, old leaves and dried grass. Alternatively, take a bag to collect materials when you go out for a walk. Twist and weave the thin twigs and dried grass into a bowl shape. Then stuff the gaps with moss and line the bottom of the nest with the old leaves (or something soft like feathers or sheep wool).
How about looking for smooth stones and painting them to look like eggs to put in your nest?
Find somewhere in your garden to hide the nest. Think like a bird! Is there shelter? Will it be safe from cats? Is it too low? Too high? Close to food and water?
Perhaps you would like to draw and colour a picture of a bird and cut it out to pop into your nest?
April
Make Wild Garlic Pesto
At springtime it is always a pleasure to watch swelling buds bursting into leaf on the trees and the fresh green leaves of wild garlic and bluebells poking up through the woodland floor. This month’s activity is making wild garlic pesto
Wild garlic likes to grow in damp places and woodlands, so head to your local woods for a spring walk to look for some wild garlic leaves. Wild garlic grows in dense clumps, up to 45cm high.
The green leaves are long and pointed with a smooth edge. Wild garlic is best identified by smell. Crush a leaf in your hand and it should smell strongly of garlic. Wild garlic has flowers – tall green stems with a cluster of many small white flowers at the top. When collecting wild garlic, make sure you pinch the leaves off carefully at the base of the stem rather than pulling up the whole plant. Collect from well-stocked areas and make sure there’s plenty left for wildlife..
Recipe
200g of wild garlic leaves, washed 
50g parmesan cheese, grated
Lemon juice
50g finely chopped pine nuts, hazelnuts, or walnuts
100ml olive oil
Sea salt and pepper to taste
1. Crush the nuts into a paste with a pestle and mortar and place in a bowl.
2. Chop the garlic leaves and grind them in the pestle and mortar before adding them to the nuts.
3. Add the cheese to the bowl, and mix.
4. Slowly add the olive oil and lemon juice and keep stirring until the mixture forms a smooth paste.
5. Add the salt and pepper.
The pesto can be used immediately with pasta or stored in jars in the fridge for a couple of weeks.
Wild garlic flowers and leaves are very tasty in salads, and 2 or 3 leaves make a tasty addition to cheese sandwiches.
May
The Dawn Chorus
May is the best month of the year to enjoy bird song. Usually, it is the male bird who sings to attract a mate, defend their territory, and keep other male birds away. Singing is hard work, so it is the strongest males who sing the best and are first to attract a mate. The female bird knows that the stronger the singer, the more likely he is to have the best territory and help her to raise a successful brood of chicks.
 The first Sunday in May is International Dawn Chorus Day, when across Europe people set their alarms early to wake up, go outdoors and listen to the free concert. But the dawn chorus can be enjoyed any morning from mid-April through to early June. The chorus starts about an hour before sunrise, often led by robins, blackbirds, and song thrushes. The sound swells to its peak between half-an-hour before sunrise and half-an-hour after, before gradually quietening to the sound levels we are familiar with during the rest of the day.
The dawn chorus is at its best when the weather is fine and dry, so keep your eye on the weather forecast, set your alarm for an hour before sunrise and take a blanket or chair outdoors with you to enjoy nature’s symphony in comfort. A flask of tea, coffee or hot chocolate always helps if the air is chilly! If you’re feeling a bit lazy, open your bedroom window instead and enjoy the music from the comfort of your bed.
If you would like to learn the individual songs of birds to help you identify them among the chorus (or impress your friends!), go to the RSPB’s bird song identifier.
SUMMER
June
Nature Mandalas
By June, all the trees have come into leaf and flowers are to be found everywhere. In our gardens, parks and countryside there are lots of beautiful natural materials to collect and then create a piece of environmental art. A Mandala is a circular, geometric pattern which is sometimes used as an aid to meditation. This month’s activity focuses on creating a colourful, circular pattern using natural materials on the woodland floor, in your garden or park, or even on the beach. It’s time to get creative!

Choose a quiet place outdoors and collect some natural materials like leaves, flower petals, twigs and stones. If you are not in your garden, remember to only collect fallen flower petals as it is an offence to pick wildflowers.
Choose a special object as the centre, putting it on the ground and then laying other items in a circle around it. Arrange another circle of objects around the first circle and continue adding more circles until your mandala is complete. It can be as big or as small as you wish. Then stand back to admire your artwork. You could take a photo to remember it.
AUTUMN
September
Rowan Jelly
This year the rowan trees are dripping with berries. At Bwlch Corog (our site), the rowan branches are drooping with the weight of the berries. I can’t remember such a good year for these beautiful berries. This is good news for birds like the blackbird, mistle thrush and redwing. 37 species of bird have been recorded eating rowan berries. The Celts fermented the berries to make wine, but today, most people use the berries to make a jelly. Rowan jelly is the traditional accompaniment to venison, and also tastes good with roasts, cheese and even toast and butter! Enjoy!
Recipe
1.3 kg (3lb) rowan berries.
900g (2lb) apples
white sugar
Peel, slice and core the apples. Put the apples in 1.2l (2 pints) of water and boil them until soft. Add the rowan berries and simmer to a pulp. Strain through a muslin bag. For every pint of juice, 450g (1lb) of sugar will be needed. Warm the sugar, boil the juice for 10 minutes, and then add the sugar. Boil for another 10 minutes. The jelly is ready when a teaspoonful of the mixture dropped onto a plate forms a visible skin. As soon as the setting temperature is reached, pour into clear, warm jars and seal.
Top tip: the best way to collect the berries is to cut the clusters as a whole off the tree and trim the excess stalks before cooking.
(Recipe taken from ‘Wild Food’ by Roger Phillips)
October
Autumn Leaf Collage
 This month’s activity is for our very youngest friends. It is a great excuse for parents, grandparents, and carers to take young children for a walk in the woods or park and collect autumnal leaves, to be used back home to create a collage. Whilst collecting, if there are plenty of leaves on the ground, encourage the kids to create a large pile of leaves which they can jump into and pretend they are a hibernating hedgehog by curling themselves up into a ball and peeping out through the leaves. Catching leaves as they fall from the trees (and making a wish when a leaf is successfully caught), is another favourite activity.
1. Collect a variety of differently shaped leaves in autumnal colours, red, orange, yellow and brown.
2. Arrange the leaves on a large piece of paper or cardboard (you could cut up a large, cardboard box or cereal packet). Try not to leave too many gaps between the leaves.
3. Using PVA glue, stick the leaves in place. You can then paint all over the front of the leaves too which will give them a nice shiny look when the glue has dried, as well as preserving the leaves a little longer. Gold glitter (always popular with young children!) would look good sprinkled over the finished collage before the glue dries.
4. Leave flat to dry and then hang on the wall to admire.
November
Candle Lights
The clocks have gone back, the days are shortening, and the weather can be very dull. Winter is ahead of us. This month we are going to make candle lights to shine a bit of light and warmth on our lives.
You will need:
A glass jar (raid your recycling), autumn leaves, PVA glue, ribbon or rafia, a tealight.
1. Go for a walk to collect leaves, berries, alder cones etc.
2. Soak the jar in water to soften the label, scraping it off with a knife. Clean and dry the jar.
3. Arrange and glue the leaves on the outside of the jar.
4. Using the ribbon or raffia, tie the other natural objects (alder cones, berries or nuts) around the rim of the jar.
5. Put a tealight in the bottom of the jar.
6. Light it when dusk arrives and enjoy the warm, glowing colours of the autumn leaves.